Configuring StreamUP User Portal
by CodeWithTD
Version: 1.0.0DLLStreamerbot Import
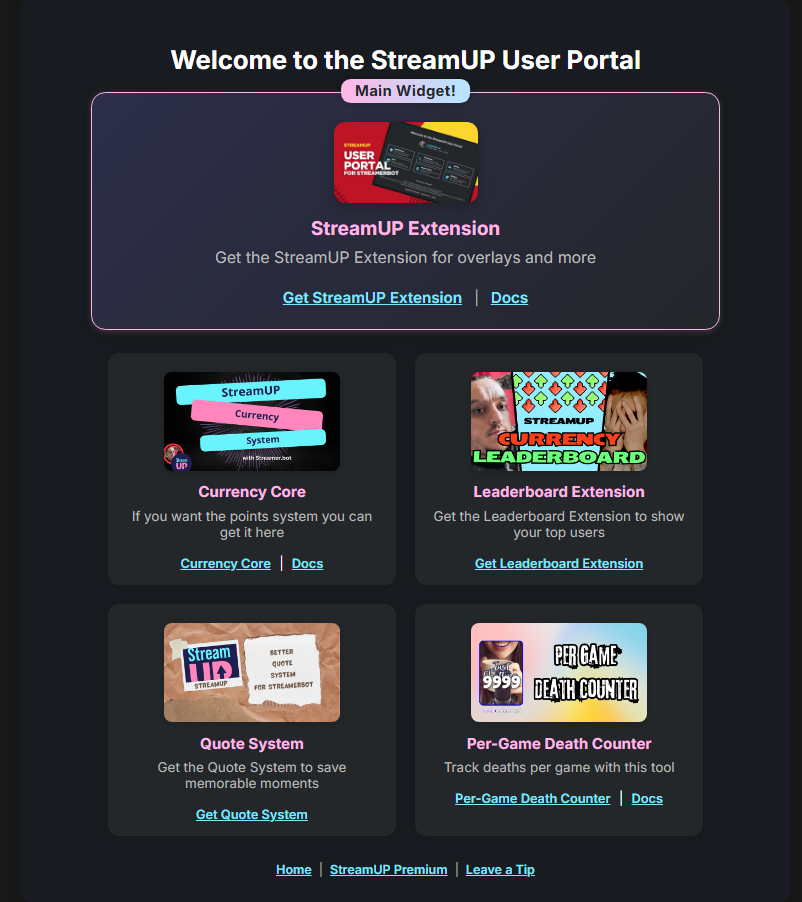
The User Portal is the hub of your stream. It allows you to have a home base for your commands, quotes, deaths, your points leaderboard and it also has a store. Fully hosted by StreamUP this is the first tool of its kind and as always its StreamUP that is leading the way!
And we have so many more ideas to go along side it!
💡General Notice
This guide assumes you have the latest StreamUP DLL installed. All required plugins, including the StreamUP plugin, and Streamer.Bot should be up to date. It also assumes you have already imported any fonts, OBS scenes or Browser Sources and Streamer.Bot import files.
Please make sure you have followed the standard product installation steps for StreamUP products.
If you haven't and where appropriate please follow these specifically:
Some steps are accompanied by images, you can click on these images to make them bigger. Where appropriate they have been tagged with Numbers, you can find the corresponding number in brackets (X)
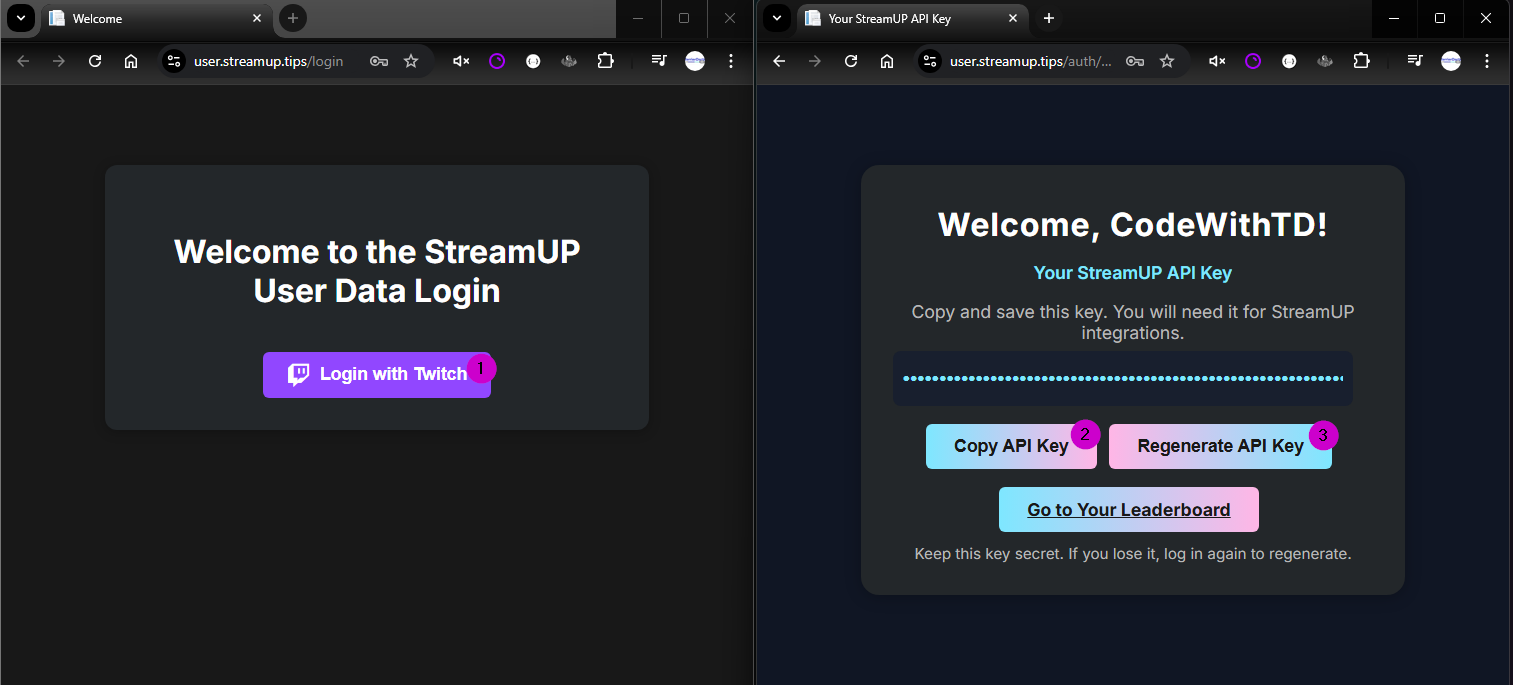
Getting an API key
- Visit https://user.streamup.tips/login
- Press 'Login with Twitch' (1)
- Once Logged in you should be able to see or copy your API key. (2)
- You will need this later.
- If you have accidentally leaked your key you can follow the steps and Regenerate it (3)
INFO
Your home page will now be available! Like this one - https://user.streamup.tips/535833752/home you will just need to put your Twitch User ID in there.
Settings
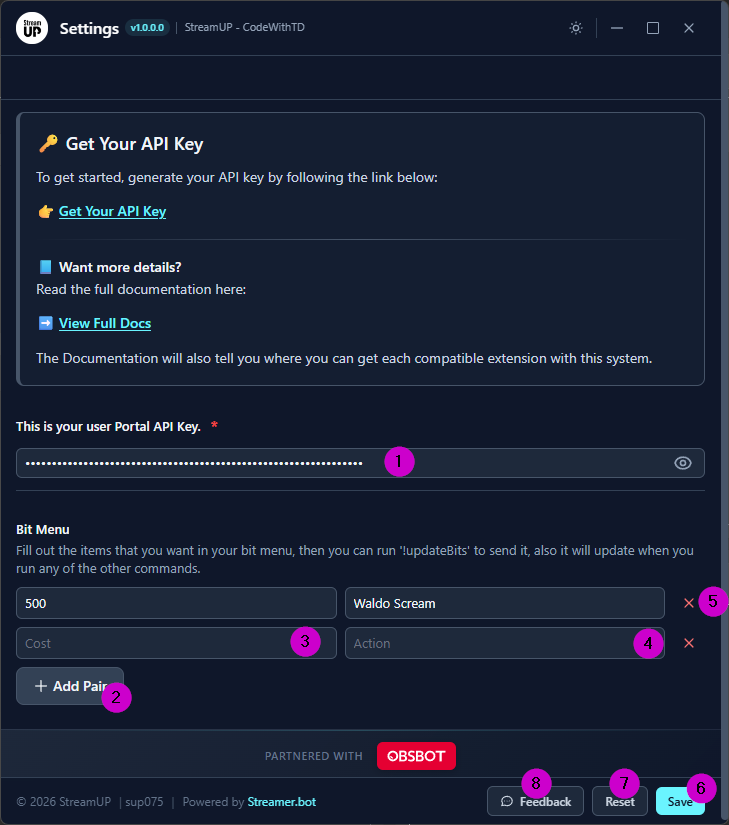
Once you have got your API key you will need to enter this into Streamer.bot via running the settings action StreamUP User Portal • Settings. This can be done by going to the action and finding the StreamUP Settings - Right Click and click 'Test Trigger' to open settings. Doing this will open the settings
You can then paste your API key into the relevant box. (1)
You can also add items to your Bit Menu. You do have some commands to do this and that will be explained under the Bit Menu section, however this is the easiest way to add them especially if you are adding some in bulk.
To add all you need to do is.
- Press
+ Add Pair(2) - Enter the cost, this can be an exact or a range so
400or234-321(3) - Enter a name for what is triggered (4)
- If you wish to delete an item you can press
x(5) - Then if you've done you can press
Save(6) - If you need to reset you can press
Reset(7)
INFO
If you notice a issue with the settings or have a suggestion you can use the feedback and fill out the form to send us your reports and suggestions (8)
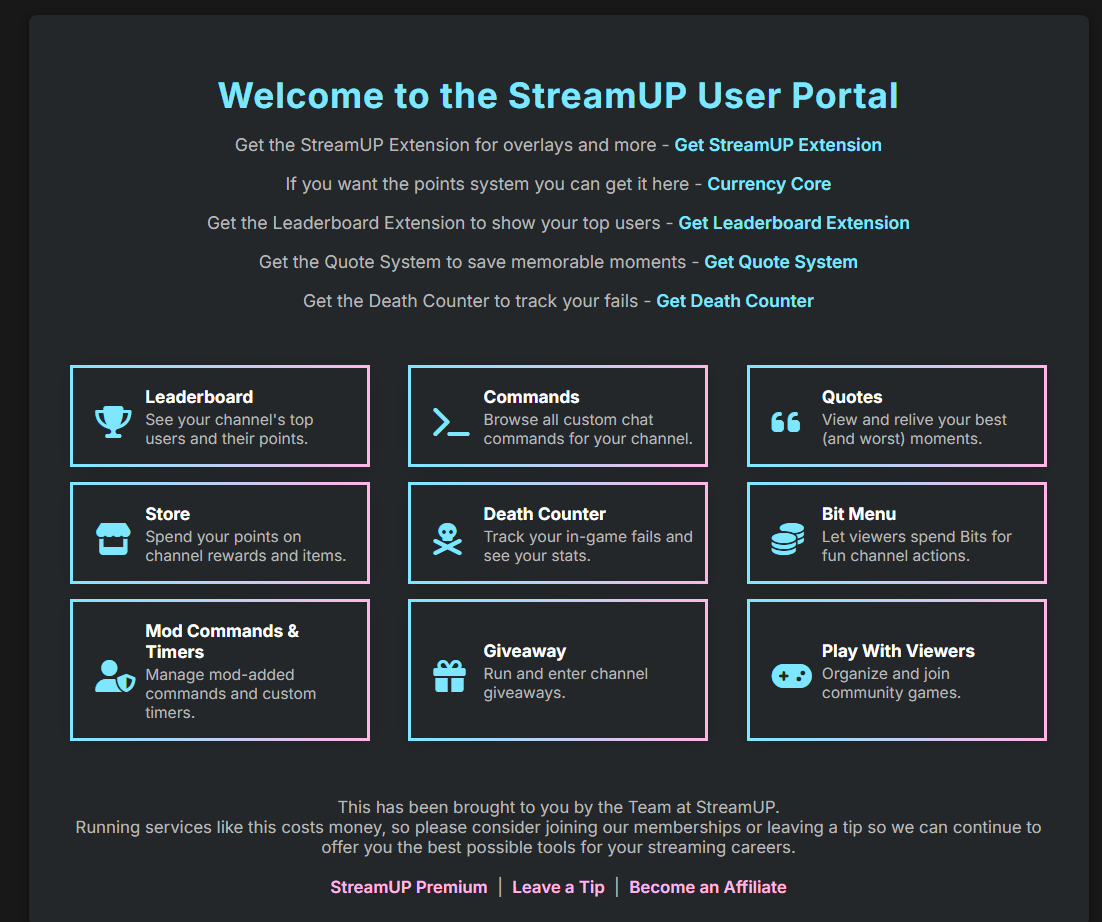
Home Page Navigation
Here is your home page this is the central hub of the User Portal.
You have such features like:
- Go to the leaderboard
- Go to Commands
- Go To Quotes
- Go To Store
- Go To Death Counter
- Got to the Bit Menu
- Footer Links for Premium, Leaving a Tip or the About Page.
WARNING
If by some chance you don't any pages, please try sending some data to see if that fixes it and sometimes if there is 0 data no pages will show.
About Page
On this page you will see where you can get all the extensions that currently work with the User Portal and the relevant docs. If not on their main page!
Logging In and Settings
How to Log in
If you are logged in to your own page you will see Settings, and here you can add store items and hide some of the pages or delete data. (Store will be explained under the store section).

Then you will be directed to these Settings Page where you have several tabs
Page Visablilty
Choose with
Page Customisation
In here you can change how things look and read.
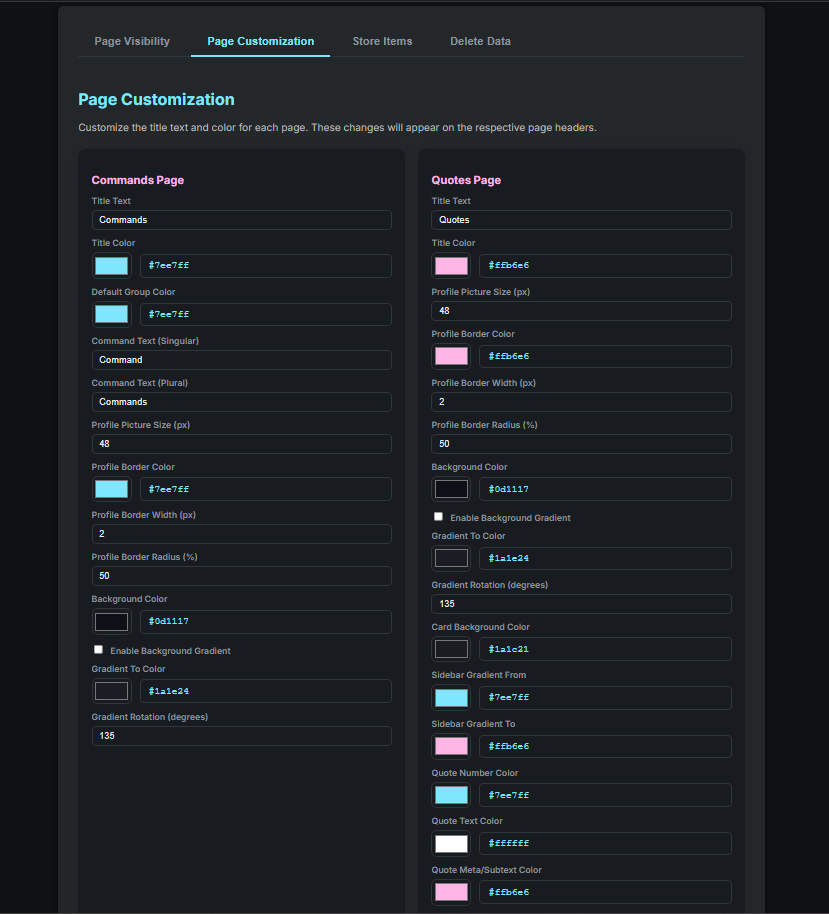
Store Items
Delete Data
DANGER
Remember This can not be undone so please take care.
Pages
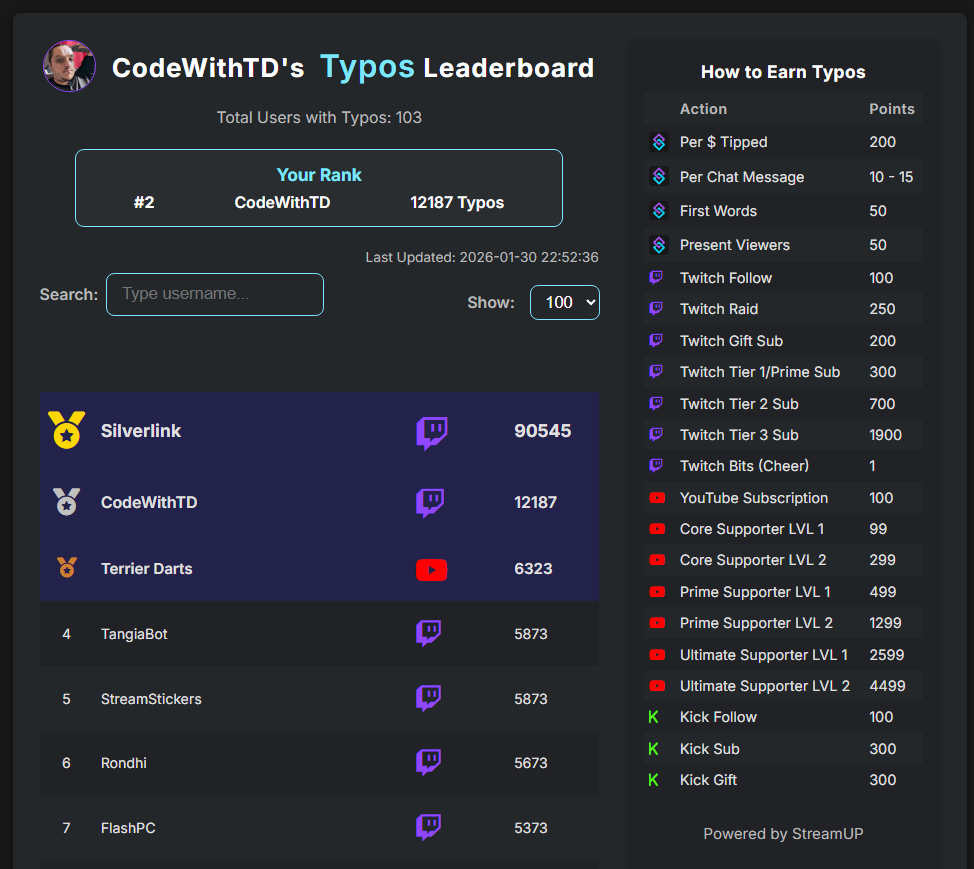
Leaderboard
https://user.streamup.tips/{broadcasterId}/leaderboard
The Leaderboard is using the StreamUP Currency Core System. However you can also get the StreamUP Currency Leaderboard so you can control any output to chat too. As it stands it only updates when the command !toppoints is ran however you can add timed action to keep it updates however its recommended to not update anymore than once every 30 seconds.
The Import includes an action called
This has a few cool features.
- It will show what you call you your Points System
- It Will show the settings you have to Earn Points
- It has a search feature (although that is only done on the page)
- You can alter how many people you see per page
- If Logged in you can see your own position and amount
- It will show you how many people are in the leaderboard
- Bronze, Sliver and Gold Medals are given to the Top 3
- Users can be excluded by adding them to the "Points Exclusion" Group.
Commands
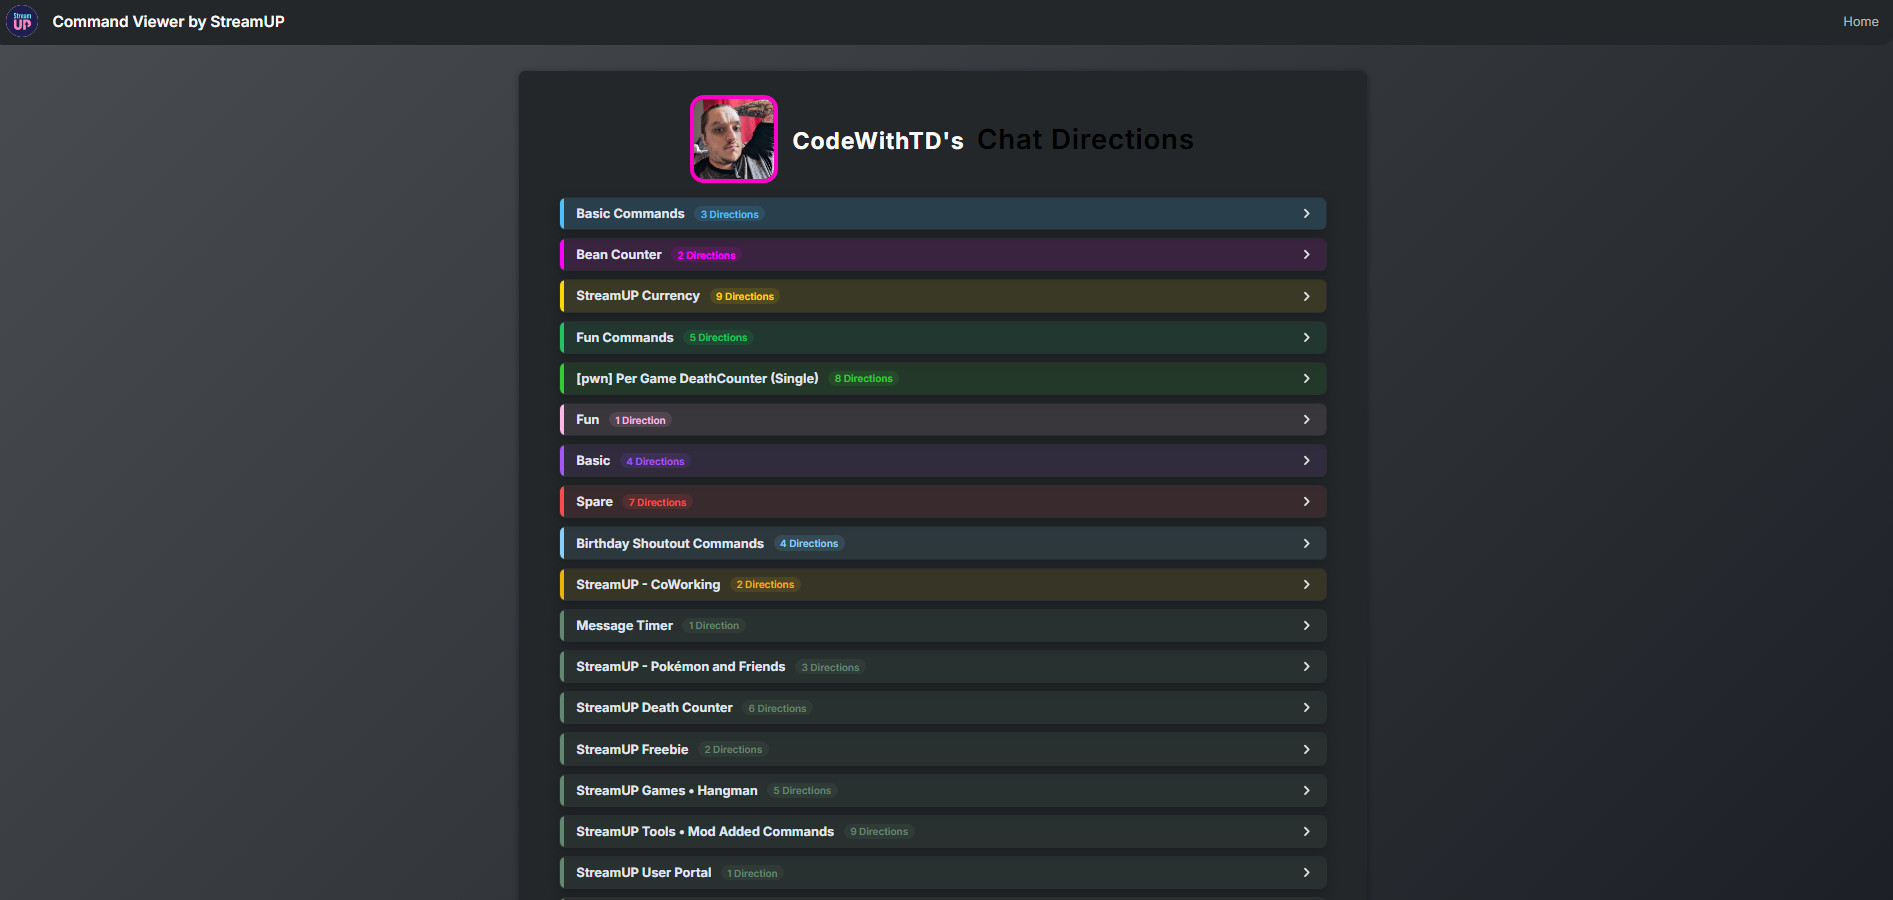
https://user.streamup.tips/{broadcasterId}/commands
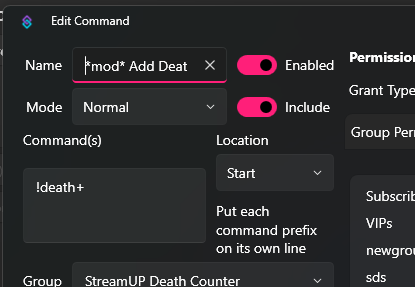
Only Enabled Commands will be shown however you can tag certain commands name for different effects.
**Tagging with a double asterisk will cause the Command to be hidden from the list.*mod*This will add the mod sword to the command so your viewers will know its a mod command*vip*This will add the diamond*sub*This will add the Sub Star
Tagging looks like this. 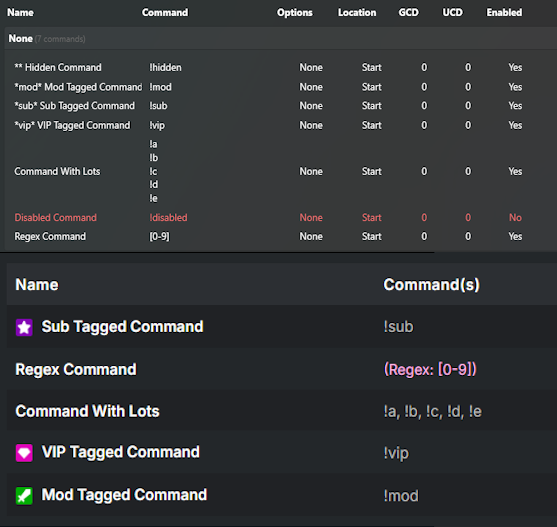
Please Note
You can only add one tag at a time to a command, so that means you will need to pick the most relevant.
Commands can only be tagged with the name.
You can also tag groups to give them a certain colour -
*blue**fuchsia**gold**green*- Perfect for Kick Commands*lime*- Perfect for those Mod Commands*pink**purple*- Perfect for the Twitch Commands*red*- Perfect for YouTube Commands*skyblue**yellow*
Tagging looks like this -
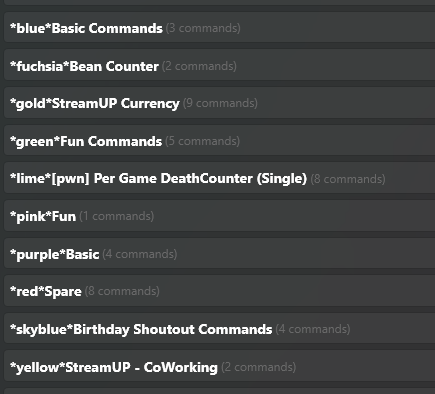
That will result in -
Quotes
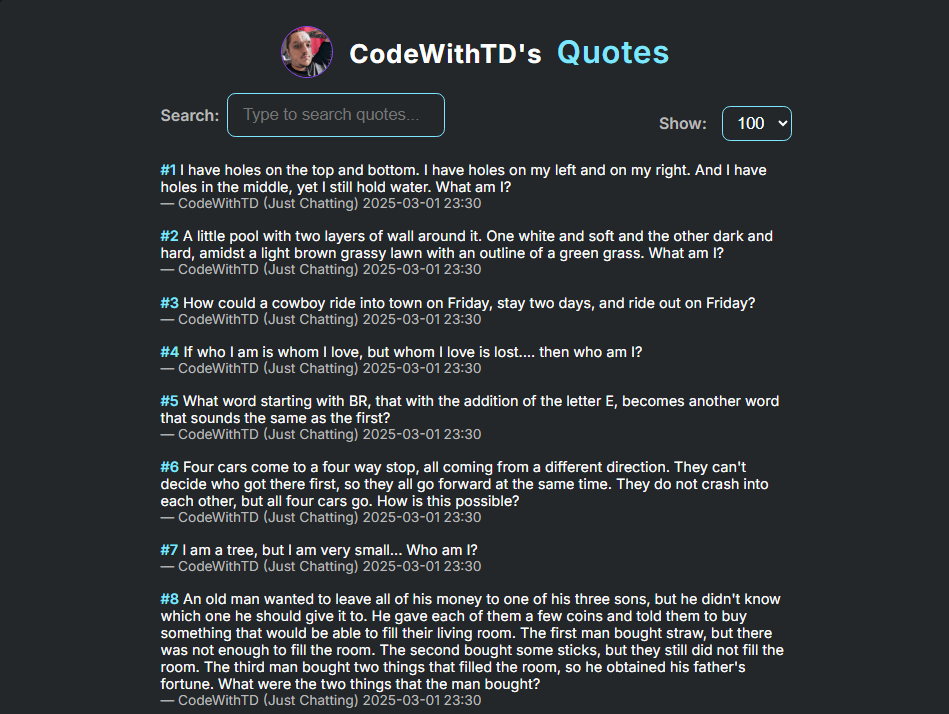
This will update whenever you add a new quote, you can search for quotes however like commands it only searches the same page. Also like commands you can control how many you can see per page. You can get StreamUP Better Quotes System this allows you more control over your quotes and allows you to search quotes in chat.
https://user.streamup.tips/{broadcasterId}/quotes
WARNING
All Quotes can be seen, however you must use the native Quote System that is built into Streamer.bot. There is currently no way to hide certain quotes.
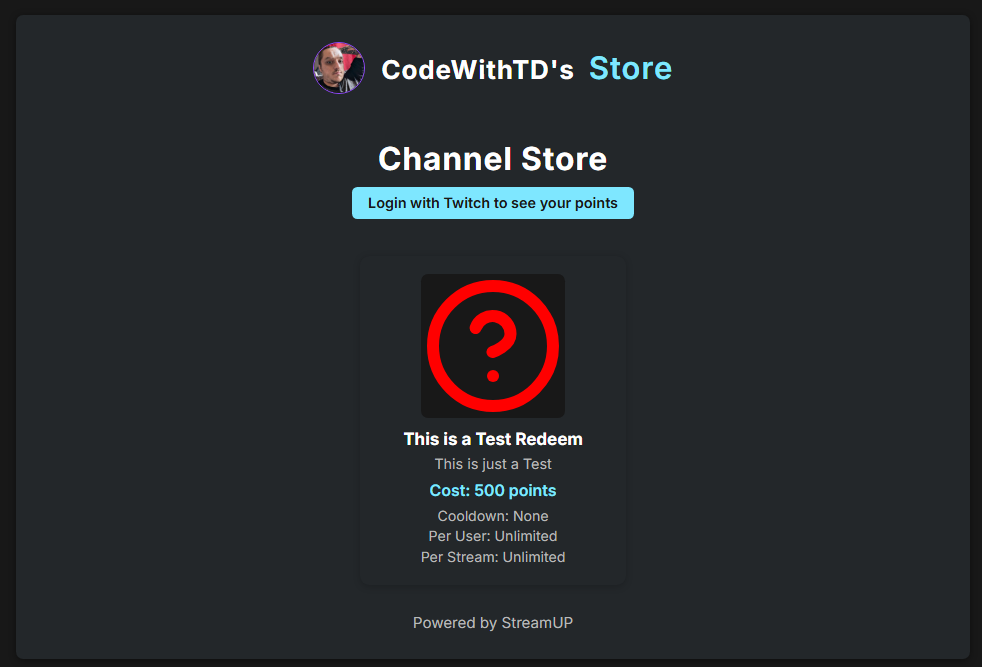
Store
https://user.streamup.tips/{broadcasterId}/store
The store will allow users (who must be logged in) to redeem items, using the StreamUP Currency Points.
In order to add store items you need to visit your settings page, this will give you an overview of the items you have.
To Add Items you can press Add Store Item, here you can also Edit and it will show the same Dialogue, Remove will delete it. Changes only take effect once you press Update Store
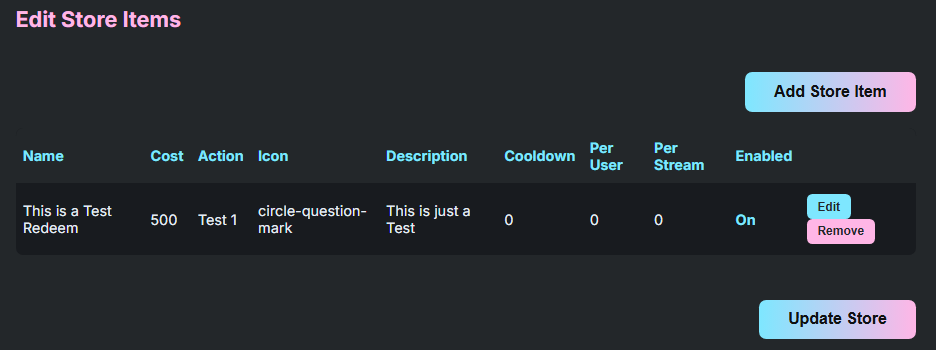
Adding Items requires a certian amount of information.
Required Information per Store Item:
- Name - The display name of the item
- Cost - The point cost to redeem the item
- Action - The Streamer.Bot name to execute when redeemed
- Icon - This is the name of a Lucide Icon (Use the link to browse)
- Icon Colour - This is what Colour you want the Icon to be.
- Description - A description of what the item does.
- Cooldown (S) - Global cooldown period in seconds before the item can be redeemed again (applies to all users)
- Per User - Maximum number of times a single user can redeem this item
- Per Stream - Maximum number of times this item can be redeemed per stream
- Enabled - Turns the redeem on and off.
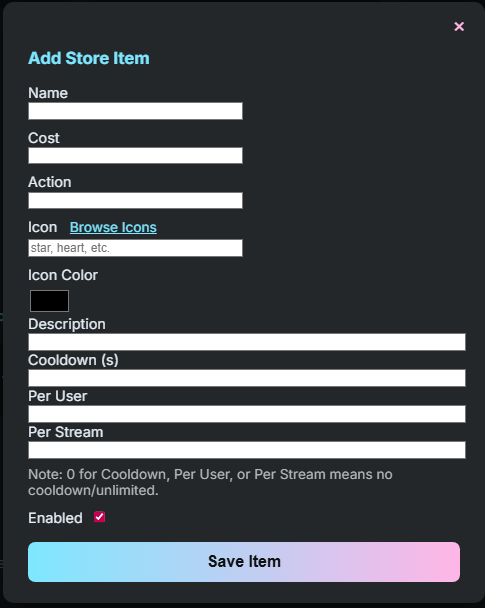
You will also need to add a Custom Websocket Client with the URL wss://user.streamup.tips/store/redeem/{broadcasterID} with the TLS 1.2 setting on.
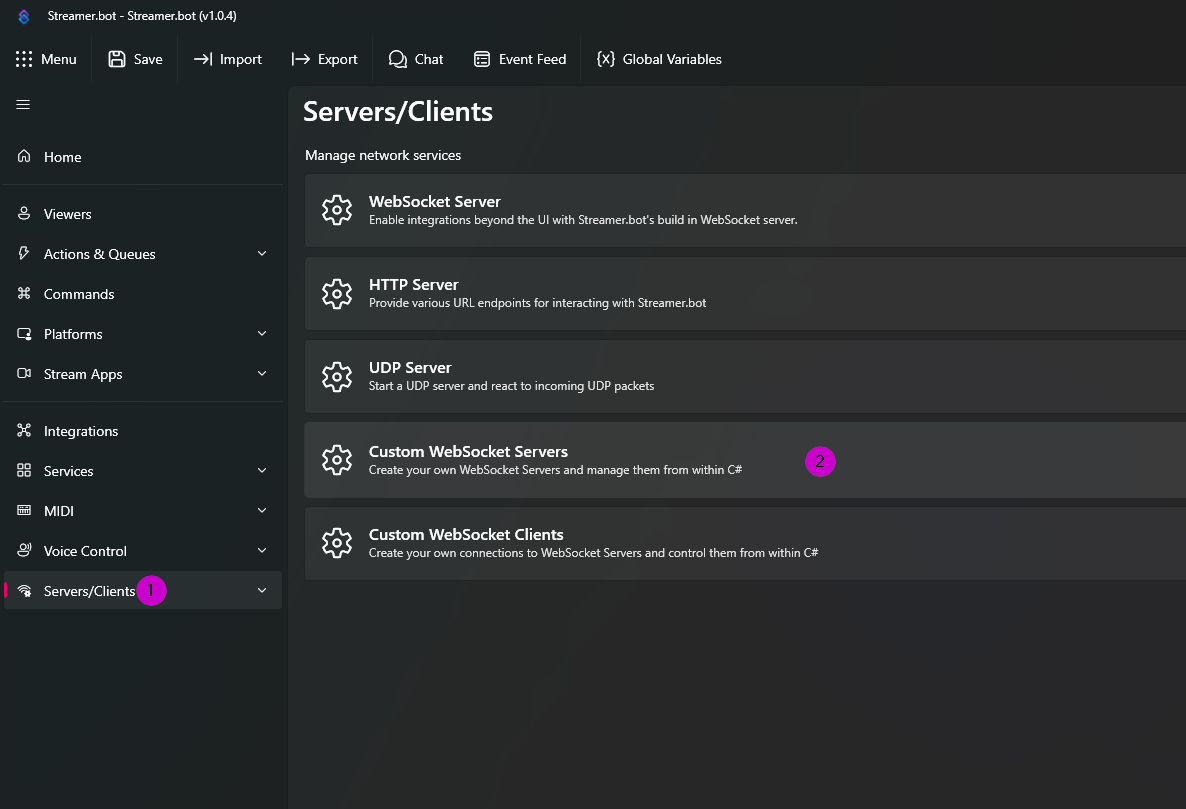
- First you need to find your
Servers/Clientstab in Streamer.bot (1) - Then Press
Custom WebSocket Servers(2)
- Right Click and Press
Add - Fill in a Name I used
StreamUP Store(3) - Fill in your Endpoint
wss://user.streamup.tips/store/redeem/{broadcasterID}(4) - Make sure TLS 1.2 is Ticked (5)
- Auto Connect and Reconnect are Optional (6)
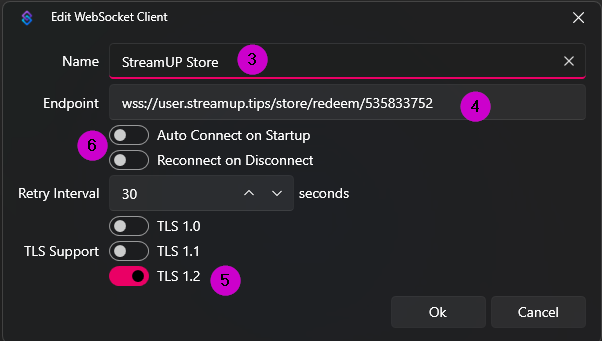
As long as it says Open you should be successfully connected and everything should now work.
INFO
When you viewers log in it only shows a best guess on there points, however all the point logic is done inside Streamer.bot so nobody can redeem something they can't afford, likewise if they can afford they will be able to redeem even if it says they don't have enough.
WARNING
There is no Live Check, so if you leave your Streamer.bot open you will need to create your own way of controlling that, you could disable to Store Redeem Action or you could just make sure the client is disconnected when you are live
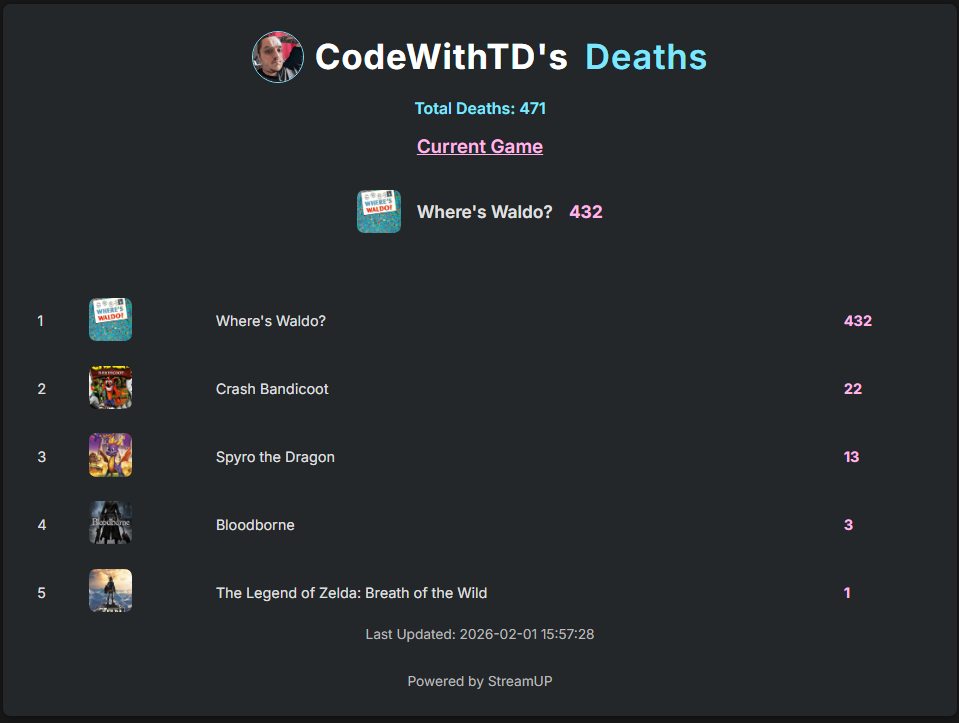
Death Counter
https://user.streamup.tips/{broadcasterId}/death_counter
The Death Counter requires the use of the StreamUP Death Counter It displays all your deaths in order and it will show your total deaths.
This will update whenever the deathDictionary is updated, for more information on how the Death Counter works visit its Documentation and that will explain how the Death Counter works and what each of the commands do.
As you can see it will also show your current game and the number of deaths you are on, if for whatever reason it can't get any Box Art your profile picture will be in place (any games without an image can be reported to us in the discord and we will try find a solution)
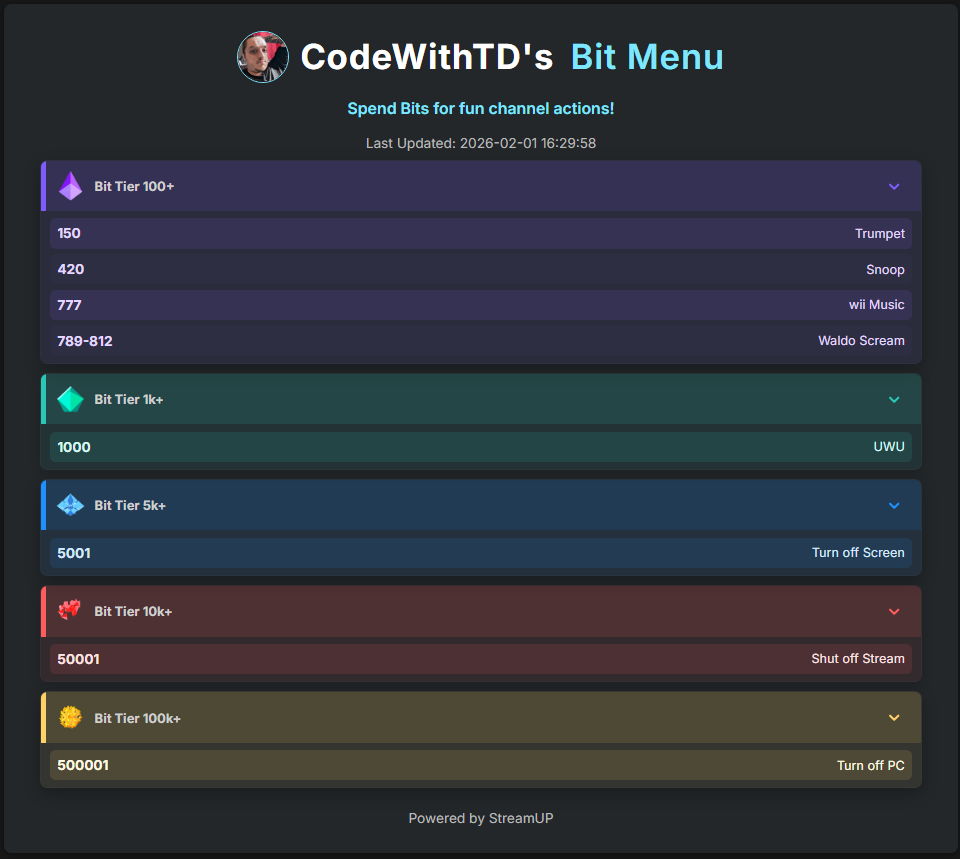
Bit Menu
https://user.streamup.tips/{broadcasterId}/bitmenu
We have already spoken about how to add items to the Bit Menu via the Settings Menu.
For added clarity, with the settings menu open, to add all you need to do is.
- Press
+ Add Pair - Enter the cost, this can be an exact or a range so
400or234-321 - Enter a name for what is triggered
- If you wish to delete an item you can press
x - Then if you've done you can press
Save - If you need to reset you can press
Reset
However we did add some commands, !addBit, !removeBit !editBit and !updateBits.
Items in the Bit Menu are identified by there cost value so please note, ALL COSTS MUST BE UNIQUE. So to use the commands you generally have to do !<command> <cost> <info on trigger> For example
!addBit 44 Hydrate- This will add a44 - Hydrateto the Bit Menu.!editBit 44 Have a Drink- This will change44 - Hydrateto44 - Have a Drink!removeBit 44- This will remove the44 - Have a Drink!updateBits- This will update the Bit Menu, this is usually done after you've edited via Settings.
TIP
Value don't need to be single numbers you can also add ranges such as 50-75 just make sure you don't add any spaces!
Bits are displayed in groups based on there value inline with Twitch's Bit Values and they should also be in order. For the instances where you have a range the lower number is used.